Function
The basic function of a taper jig is to hold the piece of wood at a specific desired angle to the blade during the cut. Most taper jig possess a locking mechanism, this enables to allow you to leave the piece of wood in place and change the stock so as to produce quick and easy cuts. Because the jig is capable of securing the wood at any you choose, you can come out with identical cuts consecutively without changing the position. The result is that every cut will be exactly the same with less effort.
Set Up

The normal procedure is to measure the cut line. In angled cuts, this can be more challenging but the concept is still the same. Have a measurement to where the cut should be made at each end of the stock, then a straight line should be drawn between those two points. Naturally, make sure that you double check your measurements. You will save much time and effort if you double check your work.
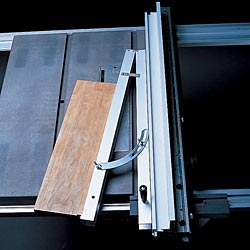
This is where the idea of how the table saw taper jig works. Place the stockpile onto the taper jig then set the jig against the fence. The fence must be positioned until the cut line and the miter slot are aligned. Adjust both the angle of the table saw taper jig and the position of the fence until the cut line is aligned perfectly with the fence and the saw miter line. Majority of the jigs function on a hinge. For that reason, sliding the fence back and allowing the bottom of the jig to expand is needed throughout the entire process of opening the taper jig. Make a measurement on both ends of the cut line to the fence once you are close. The measurements should match. When you see that the cut line and the fence are paralleled to each other, lock the taper jig by tightening the screws and measure again as usual.
 Self Made or Store Bought
 There are many ways on building your own table saw taper jig. They can also be found in home improvement stores, lumberyards, or even online. You can even build your own taper jig if you know the theory on how the table saw taper jig works.
But if you have no idea how the table saw taper jig works, it is better and easier if you just buy one. Make it a point that you familiarize with how it works. For your safety, it is very important that you understand exactly how the table saw taper jig works before using it.
No comments:
Post a Comment